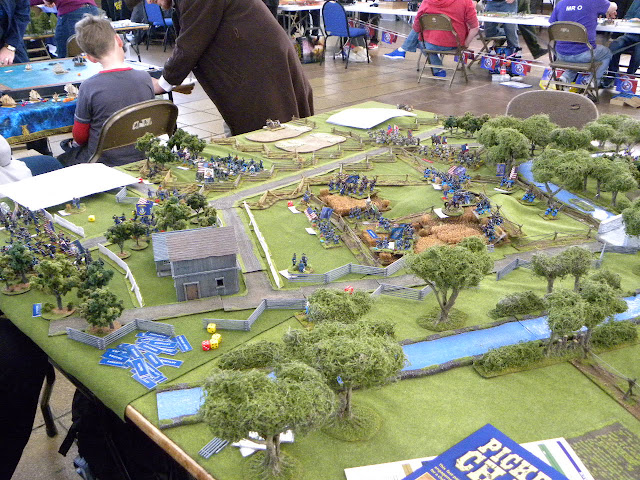
Saturday 13th May saw our annual outing to the nearest show of the year at the Exeter Legionary Show.
Jason and I set up a 28mm ACW Battle using the new David Brown rules Pickett's Charge from the Reisswitz Press / Too Fat Lardies table of goodies.
We were one of the games representing the Devon Wargames Club.
Andy and Panjo ably assisting us in running the Divisions at their command., Andy taking the Union with Jason, and Panjo with me and the Rebs.
We were playing a scenario from the brilliant Summer Storm by Brad Butkovich who has produced a fantastic set of scenario books from Amazon, other suppliers are available.
The scenario was Blocher’s Knoll set in first day of Gettysburg July 1st, 1863.
Background
As John Reynold’s Union First Corps was battling it out west of Gettysburg, Major General Oliver O. Howard’s Eleventh Corps approached Gettysburg from the south. When Howard learned of Reynold’s death, he assumed command of all forces on the field. This necessitated a disruption in the chain of command as several officers were elevated to a higher level to fill the vacancies this created. Howard left one division on the prominent heights of Cemetery Hill south of town, and ordered the other two divisions north to connect with the First Corps and protect their flank. The men of the Eleventh Corps were still under the shadow of their rout at Chancellorsville in May. The two armies were on a collision course north of Gettysburg. Dole’s Brigade of Georgians held the left flank of Rodes’ Division on the open plains. Major General Jubal A. Early’s Division approached from the northeast. The two Union divisions deployed as they emerged from northern outskirts of the town. However, Brigadier General Francis C. Barlow noticed a prominent rise north of his position and decided it would be better defensive ground. Without orders, he led his two brigades further north and took possession of the hill, known as Blocher’s Knoll, and forever after the battle, Barlow’s Knoll. It was an exposed position. Confederate artillery converged on the hill from several directions. So did Doles’ and Early’s infantry. In a well-timed assault, the Confederates threw Barlow from the knoll, causing havoc among the Eleventh Corps. Col. Wladimir Krzyzanowski counterattacked, but could do little to stem the tide. The Confederates sent the Eleventh Corps retreating back through the streets of Gettysburg, including an additional brigade sent to help. With the First and Eleventh Corps defeated, they fled through Gettysburg and rallied on Cemetery Hill. More units arrived from the south, helping to bolster the position. When the Confederates failed to follow up their victory and attack Cemetery Hill in the waning hours of the day it allowed the Union army to consolidate its position during the night and offer battle south of town the next day.
Game Overview
It’s the oft-maligned Eleventh Corps versus Early’s Division on the plains north of Gettysburg for control of each army’s flank. Can the Eleventh overcome its jumbled command structure, poor positioning, and past reputation to hold the line?
The terrain map is 6’ x 6’. It is very open with lots of room for maneuver. The scenario begins at 2:45 PM and ends on Turn 8 or when one side can no longer advance or maintain its position.
Terrain
The map is mostly open terrain with lots of fences. Lots and lots of fences, which incidentally, did feature as obstacles in many of the reports of the battle. So they are not just useless eye candy. Many of the fences have gaps in them where artillery and infantry have passed through. The most prominent rise is Blocher’s Knoll in the center of the map, and Rock Creek with its wooded banks cuts through the board. The creek is broken terrain and costs an inch of movement to cross. Any infantry unit in the creek can use the banks for an additional cover benefit. The smaller streams are just for visual appeal. They present no obstacle and give no cover benefits. All woods are open and count as light woods. The swampy ground to the east is broken terrain. The orchards act as light woods for visibility. Movement is also as light woods for infantry and cavalry regiments in line of battle, disorder, or field columns. They are open movement for units in column and skirmish formation. They have no effect on the movement of artillery batteries.
Deployment
To begin the game, place all units on the board where shown. Brigade, division, and artillery battalion commanders may begin anywhere within an inch of a regiment in their command. General Early may enter the board on the Harrisburg Road at 2 on any movement turn after Turn 2. General Schurz begins the battle at the Kitsman house. The three Confederate batteries deployed east of the Harrisburg Road are unlimbered and ready to fire. The Charlottesville Battery is limbered on the road ready to follow Gordon. The 26th Georgia has been detached and ordered to support the three Confederate batteries, but the player may move the regiment with no restrictions. The Confederate player controls two batteries off-board artillery. The Morris Virginia Battery t may fire from any point at the shaded area marked 4. Simply calculate the distance from the edge of the board to the target, and add an additional foot. Then determine the firing strength and results normally. They are on an elevated ridge, and have line of sight to all units on the board not obscured by woods. The Jeff Davis Battery may fire from any point at the shaded area marked 5. Again, calculate the distance from the edge of the board to the target, and add an additional foot. They are not on an elevation, or at least not as much, and all normal line of sight rules apply. At the beginning of each turn the Union batteries 13th New York and Battery I, 1st Ohio may declare they are engaging in counterbattery fire against either of these two off-board Confederate batteries. The two batteries may split their fire between the two Confederates. If the Union player declares this counterbattery fire, the Confederate batteries may not fire, but the Union batteries may not move or fire at any other targets either. Be careful, eventually the Union player will have to decide between suppressing the Confederate artillery and supporting the rest of the corps against Early.
Coster’s Union brigade may enter the board on the Harrisburg Road in march column at 1 on Turn 6. Battery K, 1st Ohio follows immediately behind it. The Confederates receive reinforcements as well. Hay’s Brigade enters the board in line of battle at the shaded area at 2. From left to right (from the Confederate perspective) they are the 8th, 7th, 9th, 6th, and 5th Louisiana.
Hoke’s Brigade enters at 3. From left to right the 57th,
Brigadier General John B. Gordon 21st, and 5th North Carolina enter in line of battle. Both enter on Turn 2.
Victory Conditions
At the end of the game, calculate the number of Victory Points awarded for loss of units. Control of Blocher’s Knoll is worth 3 Victory Points. To be in control of the hill, no unrouted enemy unit may be within three inches of the base of the hill. Officer figures do not count toward control. If nobody controls the knoll, nobody receives the Victory Points. The side with the most Victory Points wins.
Display Board for the game and the Devon Wargames Group
Initial Union Depolyment at Blocher's Knoll
The Reb Batteries formed up as Grand Battery to fire on the knoll, which they did all day, causing much mayhem and casualties.
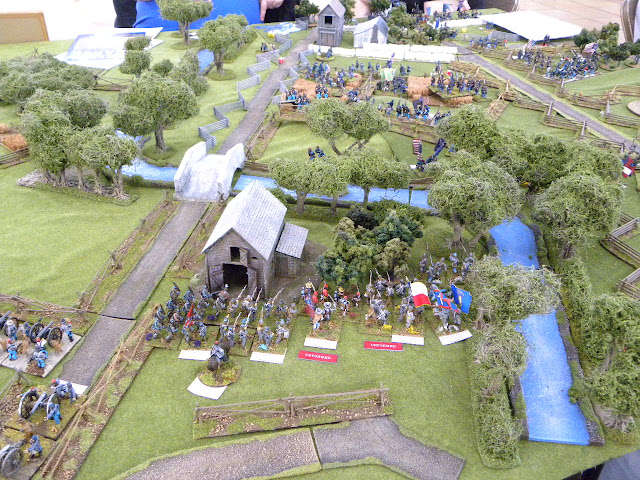
Gordon's Georgian Brigade on the Reb Centre getting unformed crossing the many fences and orchard approaching Rock Creek.
Dole's Georgian's on the right of the line...
Union view of the lines with Von Gilsa at the knoll, to right of image, Ames in behind the knoll crossing the wheat fields, Von Amsberg on the left and Krzyzanowski at the rear currently redeploying from left to right sectors...
Both sides squaring up to each other, Von Gilsa and Ames Union brigades forming a firing line at the knoll, one of the guns firing a great shot and managed to kill the Regimental leader of the 153rd Pennsylvania and forced them to retire, see those Yankees cowering at the back left of the picture...
Good shot Panjo...
The Rebs managed to get both Hays Louisiana Brigade in the centre on turn 2 and Hoke's North Carolina Brigade on the left, I decided to bring them up fast in march column, trying to outflank the Union...
Trouble with having two brigades in one area it starts getting crowded very quickly...
Doles Brigade deployed into extended line to try and hold the right flank, they managed to cause some casualties, but started to take a pounding with Andy's demon dice rolling they began to take heavy casualties...
The Bloody knoll...
With Ames' and Von Gilsa's Brigades becoming intermixed, this would lead to issues in command and structure later in the game.
Gordon's Brigade manages to get across Rock Creek in some disorder becoming unformed, having to reform takes time all the while under fire...
Doles on the right, casualties mounting...
Jason on the left looks to JJ who is our resident photographer of the Devon Wargames Club, Oh and the Chairman, both of whom have very good blogs.
Just as Hoke starts to march up the left side of the table...
View from the Union lines, with the Rebs massing in the centre, the knoll looks to be a very tough nut to crack...
Rebs force across Rock Creek pushing back the skirmish line of the 54th New York...
The knoll is cleared of the Union guns who after sustaining withering fire from the Reb Batteries was forced to dispersed along with a union Regiment, leaving a hole in the line, and with Gordon's Brigade forced to retire the Rebs are able to bring forward the fresh Brigade of Hays, who are preparing to go forward...
Krzyzanowski is forced to deploy to his right on the road to cover Hoke's Reb brigade who had Quick Marched for two turns up the flank...
Hoke on the Union right still in march column to move fast, ready to deploy into line to fall on the flank...
The situation at the end of the game, only reason we stopped at end of turn 5 was due to being the end of the day at the show... Andy had decided he would need to back behind the knoll as he was taking a pounding from the fire line and the grand battery...
Doles Reb brigade had taken such a pounding was forced back to the base line taking 20 casualty hits over the three regiments, 6, 8 and 6 respectively, I would have been forced to play a rally in the next turn or they would have been dispersing...
Final look of the field of battle, with the glorious BG Jubal Early aka Panjo contemplating the days actions and how to explain his losses to General Lee...


Looked like a great game matey
ReplyDeleteCheers Geoff, PC are a really enjoyable set of rules, great game and company... see you soon...
ReplyDelete